Sunday, November 14, 2010

Tag! You’ve hit my sweet Butt!

I know I haven’t been around in while and I am sorry for that, however if you read my blog you will know that I am now working and have little time to post. I am back and yes, this particular post refers to early October. As far as my next post, I do have something in the works this weekend (Nov.13-14) …It may take me a few weeks to post, but I know you will all love it and so I appreciate your patience.

(October 2010)…I’ve been a bit distracted the last few weeks, as I caught a nasty cold and my body didn’t want to attempt anything. What exasperates me is that for the almost 2 years I was out of work, I never got sick. Yeah, there were times I was out of the weather, but never with the common cold or flu.

A month and a half into my new job, I have to call in sick, because I got the bug! What bug, it’s hard to say, but it consisted of Sinus Headaches, congestion, fatigue, nausea, Smoker’s cough (Yeah I’m a smoker – I think most cooks/chefs are smokers, have you ever seen Hell’s Kitchen?-They all smoke!) and complete weakness to the touch!

No matter, I think I am finally over the 2 week mess of feeling like crap and finally had the energy to be productive during my weekend time.

This blog is about how good I am about cheap eats and keeping it real. It’s about how I am innerly (yeah, it’s a real word (adv)!-not sure why spell check has deemed it bad) proud I am that I can cook. I made some really great eats today and am excited to tell you all about it.
I was thinking bolognaise sauce when I came up with this simple concoction, because there were many ingredients I didn’t have to make the classic sauce. I was also feeling good enough to make my own pasta today, so not only am I going to bring you a great sauce, but will give you a repeat of the pasta recipe.

So, I have a pasta machine, hand cranked of course, but if you as the reader does not have one, you can skip the pasta recipe and go straight to your supermarket and buy some fresh tagliatelle for this ultimate dish. If you can’t find Tagliatelle, Fettucini or Papardelle will work just as well with this recipe.

I am thinking honestly, that I may like this dish better than the plain ole meatballs and spaghetti dish! The fact that its fresh pasta and sausage sauce really gets the left (or is it right?) of my brain on overload of senses and taste.

Sweet Sausage Tomato Sauce with Homemade Tagliatelle:
Special Equipment: Food Mill, Pasta Machine
For the Sauce: Which is the best part of this pasta dish:
  • Garlic-Finely Chopped (NOT MINCED) About 8 Medium or 6 Large Cloves (me, I used a whole clove!)
  • 1 28oz Can Whole Tomatoes
  • 2 Tbls Dried Italian Herbs…Fresh is best…Oregano, Basil, Thyme, Sage, Rosemary
  • 1 Tbls Extra Virgin Olive Oil
  • ¼ inch Slice of Pancetta-Chopped into fine cubes
  • 1 Medium Onion roughly chopped, but uniformed (Size of Onion Chunks is personal)
  • ½ Can or ½ tube of Tomato paste
  • 1 Lb of bulk Sweet Italian Sausage (if you want it spicier, replace with Hot Sausage)…Remove Casing if you can only purchase in Link form.
  • ½ Cup of water or wine if you prefer (I couldn’t afford the wine)
  • Freshly Grated Parmesan Cheese (Please get the good stuff!)
  • S & P to taste

Prep Ahead: Take can of whole tomatoes and run through your food mill in a bowl until it looks like tomato soup. If you are using Dried Herbs, add to the tomato puree and put to the side.

Start with a deep hot skillet, add olive oil and pancetta. Cook pancetta until crispy and remove to the side. Add garlic onions and sausage over medium heat and cook until sausage is browned. Once Sausage is cooked, add the crispy pancetta, tomato puree and bring to a low boil. Add tomato paste and wine and mix in thoroughly. If you are using fresh herbs, go ahead and add those. Stir until sauce has thickened and let simmer for about 15 minutes. Don’t forget S & P to taste.

For the homemade Pasta-experts (About 1.5-2 lbs – Will feed 4-6 people)

Now I should let you all know that traditional Tagliatelle in the Italian world purely Egg, Flour and Salt, but I seem to have pasta making issues with that blend. So I go with my old standby which includes semolina and from my eye and preference Extra Virgin Olive Oil and depending on the weather in my apartment, a little bit of water if necessary.
  • 2 C AP Flour or Superfine 00 Italian flour
  • 1 C Semolina Flour
  • 1 ½ Tsp Sea Salt or Kosher Salt
  • 4 Large Eggs (Room Temp)
  • 1Tbls Extra Virgin Olive Oil
  • ¼ tsp or more of water if necessary

After Pasta is cooked, add to skillet of sauce and cook for another minute or 2. Plate and put freshly grated or thinly sliced parmesan cheese (use a vegetable peeler to get those fine slices). A little more fresh pepper and you are set to go! Enjoy everyone!

Monday, September 27, 2010

Cheese Freeze – Gougeres!

So when I actually had money to spend, being in NYC, delivery for anything is just a given. Take out, Dry Cleaning, Laundry, Drug Store (inlc. sundries), and most of all groceries. I tell you, I had quite the pampered life for a little while.

There is one major On-line grocer in NYC that I was very loyal to, until I lost my job and to be honest, a few of my orders that included fresh herbs were a bit disappointing and I had started to order less and less from them. However, what I did and still do trust with them is their Meat, Fish, Cheese and Bakery departments. They offer a lot of options and the quality is fantastic. I just wish their fresh produce was better and more consistent.

Another major positive for this on-line delivery grocer is they have amazing and I do mean amazing “ready to cook” meals from great restaurateurs around the city and also offer great local frozen options from bakers and artisanal retailers. As for general groceries, they do lack a bit with new items, but they do have what you need overall.

Most specifically for this post, it’s about a product I ordered when it was available, frozen Gougeres, made from a cheese/restaurant retailer called Artisinal Cheese. They were expensive ($10) and if I remember correctly, only 15 per box. Regardless of the expense they were such a lovely treat, popping one or two in my mouth were just so heavenly.

Not until I was broke and craving gougeres, was I thinking about how to make them on my own and store them in the freezer (hey, I am single, most recipes call for 30-40 gougeres…Cooking isn’t the issue, but eating them all for myself, the quantity is a bit too much in one sitting). I want the convenience of taking out what I need when I want it.

I looked up various recipes and found only 3 that seemed to be most authentic from the frozen version I became accustom to. One from Jacques Pepin for Food & Wine Mag, the other from Epicurious and the final from Artisinal Cheese via Fresh Direct (my on-line grocer).

After reading these recipes, it actually brought me back to my early teen days when I wanted to make homemade éclairs and cream puffs. The trick is to understand how to make a Choux, which is a no more than a thick doughy roux if you think about it. My Mom encouraged me to figure out how to make these sweet treats and with her help, I knew at a young age how to make such sweet gastric delights.

Because I had previous knowledge and understanding of how to make“choux” dough, following and making the gougere recipe was a simple task and really, really quick to put together. The trick this time was not only to make the cheese puff treats, but to freeze them prior to cooking, like the frozen packages I bought from FD, then figure out the actual cook time from a frozen status as it will differ from the recipes.

The following recipe I used as a test, yields about 30-40-1 inch radius (or a tad less than half a dollar size) gougeres. One thing I did not like about this recipe is that there was way too much paprika. My next attempt, I will use less. Although, my hat is off to Jacques Pepin, as he is my male French chef hero and regardless of the overwhelming paprika, these came out delicious!

Before I list the recipe I used and other recipes to consider using, I want to give you explicit instructions to “pre-freeze” and store these treats, so that when you are ready to serve, you can just pop them in the oven when you are ready.

When you make any of the gougere recipes I have provided, if you decide to freeze instead of cooking immediately, make sure you have enough room in your freezer to accommodate a sheet pan (mine is 13x17).

When you complete your choux dough, pipe onto your sheet pan (with a parchment lining) as per the recipe instructions (NOTE: you can pipe them closer together to fit more on the pan if you are not baking them immediately). But rather than putting in the oven, immediately put in the freezer for about 2 hours. Once frozen, remove the frozen choux from the sheet pan to a proper freezer bag.

When ready to cook, preheat your oven to 400 degrees, place your frozen gougeres approximately 2 inches apart and bake for 20-25 minutes. However, and this is important!!!! After 5-10 minutes in the oven, sprinkle Fluer de Sel and additional cheese on top. Continue cooking until golden brown. Remember, each oven temp is different, so it is ultimately up to you to decide when these treats are done.


Pour votre santé et profitez-en! (To your health and enjoy!)

Recipe 1: http://www.foodandwine.com/recipes/aspen-2002-gougeres
The Recipe I used in the Pics Above.
Recipe 2: http://www.epicurious.com/recipes/food/views/Gougeres-102306
Recipe 3: http://www.freshdirect.com/ (Below)

GOUGERES (FRENCH CHEESE PUFFS)

From "Artisanal Cooking" by Terrance Brennan and Andrew Friedman
Makes 55 Gougères
  • 4 tablespoons butter
  • 1/4 cup plus 2 tablespoons milk
  • 1/2 cup water
  • 1 1/4 teaspoons course sea salt
  • 2 pinches cayenne
  • 3/4 cup all-purpose flour, sifted with 1/8 teaspoon baking powder
  • 3/4 cup plus 3 tablespoons grated Gruyère (from about 4 ounces cheese)
  • 3 eggs, at room temperature
  1. Preheat the oven to 400°F. Put the butter, 1/4 cup milk, water, 1/4 teaspoon sea salt, and the cayenne in a 2-quart saucepot and set over medium heat. Bring to a boil, then add the sifted flour and baking powder. Remove from heat. Stir well with a wooden spoon and return to the heat. Cook, stirring constantly, until the dough pulls away from the side of the pot, approximately 4 minutes. Remove the pot from the heat again and transfer the dough to the bowl of an electric mixer fitted with the paddle attachment. Add 3/4 cup of the cheese and paddle on low, until just warm, about 2 minutes.
  2. Add the eggs to the mixer, 1 at a time. Continue to mix the dough until smooth and shiny, about 10 minutes. The mixture should be cool.
  3. Line 2 large baking sheets with parchment paper. Place the dough into a pastry bag fitted with a #6 tip.
  4. Pipe the dough into 1-inch rounds, each about 1/2-inch high. Allow about 1/4-inch of space between each gougère. Each tray should fit about 28 gougères.
  5. Brush the top of each gougère with the remaining 2 tablespoons milk and sprinkle with the remaining Gruyère and some sea salt.
  6. Place the baking sheets in the oven and bake for 5 minutes. Turn the trays around and continue to bake until the gougères take on a deep, golden-brown color, approximately 7 minutes more. Serve hot from the oven or keep the gougères, loosely covered, at room temperature for up to 2 hours, then reheat at 400°F for 2 1/2 minutes.
  7. Bake until golden brown, approximately 7 to 10 minutes.
  8. Serve hot from the oven or keep the gougères, loosely covered, at room temperature for up to 2 hours and reheat in a 400°F oven for 2 1/2 minutes.

Saturday, September 11, 2010

Mish Mash My Spaghetti Made a Splash!

Long about a Saturday Night…a couple of glub, glubs relaxin’ drinking some beer, thinkin’ ‘bout food. Well I looked in my cupboard and put my face in the fridge, I scratched my head and I grabbed all the leftover stuff and then I made a Mish Mash of my Spaghetti splash and well, I had a blast!
 
Ok, that opening statement is probably lame and geeky, but it’s been in my head for about a few weeks now and just had to start this post with it. It actually explains why I seem so giddy right now. Not only do I have a mash of a recipe for you, but I am also informing those who actually do follow me, that I finally, after 2 years ( I won’t say long, as time has gone by very quickly for me, even if I wasn’t productive) have a JOB! Yes, I finally have a job with a very prominent organization.
 
I don’t know if I can legally state the company name, but what I can tell you is that they are a Fortune 500 Company, they are currently listed as one of the best companies to work for in 2010, they are also listed as one of the best companies to start a career in (this is especially noted for those upcoming youngungs).
 
The company I am working for is one of the most respected tax & accounting firms out there. The fact that I can now put their name on my resume will open tons of doors. No matter, because the division/folks I work with after just a week, are most incredible and I am truly excited to learn more from them.
 
Back to the Mash…I started this blog to keep me busy while I was out of work. However I found that I truly enjoy posting my cooking/baking efforts for all those who are interested in these antics of mine. So, I do promise that I will continue to update this blog with every effort. Though the postings may not be as consistent as they have been; so, for those who do follow, please keep checking in. I really do appreciate your loyalty.
 
Today is a new day, as I am officially going to coin the phrase “Mish Mash Eats” AKA “MME” or the Eats can be substituted for Pasta which would be “MMP”. So unlike “EVOO” or other crazy culinary coined phrases, from some well know celebrity chefs/cooks, are in some ways just bogus to us regular folk who are just trying to make a meal out of nothing. MME, MMP or MM(any other major addition),is much easier because the acronym includes anything and everything you might have in your kitchen that is edible.
 
MME is just that, a Mish Mash of Eats left over in your pantry, fridge or freezer to create a satisfactory meal concoction. You just have to be open on how you utilize the ingredients. MME does not mean throw all that you have in a pot and hope it will be tasty or even edible. MME does have to have some compromise to the taste buds and work well with the all the other ingredients.
 
Now the MME I have for you is of singular left over stuff and not “leftovers” from a previously prepared meal. My leftovers in this instance are the bottom of the jar kind, with a half a box of Pasta, which would now make this meal an MMP.
 
I occasionally come up with odd MME’s that eventually are really tasty, but I will admit that all my MME’s are very fattening and without frying, probably have the same fat and calories as if you ate a burger with cheese. But in my case, I only have enough for one serving anyway and no leftovers to temp me even more. So those watching the waistline, should not be offended or disgusted, but rather take the “technique/method/idea” and make a healthier MME (or MMS –Mish Mash Salad) to make you feel better.


So here are my ingredients for my MME/MMP – these are all approximate measurements…use your eye on what you have left. If you have less of what is listed, use it anyway. This is all about using the bottom of the jar, not about exact measurements.
 
Mish Mash Pasta 
  • Any Pasta – About 1-2 servings Left in the box
  • Ricotta – about 1/8th Cup
  • Capers – about 1 tbls
  • Sour cream – about 2-3 tbls
  • Salsa – about ½ jar
  • Basil – about 4-5 Leaves-Chopped
  • Parm Cheese – I always purchase whole Parm Cheese to grate on Demand…If you buy the “jar” or pre-grated crap, use the little you have left.
  • Gorganzola – I had this on hand from another recipe…I used only a portion of what I had, as it is a strong cheese, but what it does if used properly with an MME gives a bit more flavor, like adding S&P to taste. When mixed with other milder cheeses, it will enhance those flavors.
  • Half and Half – about 1-2 tbls.
  • Garlic – I always have this on hand and never try to run out…so for me, 5-6 large cloves minced work. Eyeball it depending on how much pasta you are actually cooking. 5-6 cloves of Garlic for ½ lb of pasta is good for me!
  • Oil…I Only use Extra Virgin Olive Oil for 99% of my cooking. But if you only have corn/canola or other oil, that will still work. Just keep in mind that some oils are stronger than others. A sesame or flavored Oil may be too much, but what would I know…it’s your taste buds. 
So now to prepare this MME: This time I am going rogue on my previous instruction template and explain more about the method/technique. Look, in some ways there is no right or wrong way to put an MME together. But there are times where you still have to be somewhat methodical about it.
 
In this MME/MMP case, it’s really about how the above ingredients fit into what you eventually want, which ultimately becomes and “Alfredo” or “White Sauce”. There lies the actual technique. If you know how to make a “white sauce”, then you can figure out how to incorporate all of the ingredients above. If you don’t know how to make a “white sauce”, it’s pretty easy.
 
Many of those who think they can’t cook or even are afraid, already have applied master cooking techniques without even realizing it. For instance, has anyone ever made homemade Mac & Cheese? The base of the Cheese mixture is what is called a “white sauce”. The real “white sauce” is essentially and even mixture of Butter (maybe even oil), Flour and milk. Butter, Flour and Milk can be substituted for any other “like” ingredient.
 
So, how do you make a “white sauce” (which is an actual culinary requirement) and then make it your own variation with all the bottom of the jar ingredients or even follow a proper “white sauce” recipe?
 
Here’s my hacked method for quick and easy white sauce:
  1. Take a sauce pan over medium heat
  2. Add butter and/or Oil until melted/hot.
  3. Add Garlic (in this recipe) and sautee for just a few moments. You don’t want the garlic to burn.
  4. Add Flour and whisk immediately
  5. Add Dairy: Half and Half & Sour Cream – Heat until sauce thickens. (note: this may thicken quickly if it’s a small serving)
  6. Add Cheese to melt
--The above is your Quick and Easy White/Cheese Sauce--
  1. Add Salsa or Tomato Sauce
  2. Heat until slightly thickened again. It won’t get as thick as earlier.
  3. Transfer your cooked pasta to sauce pan and mix.
  4. Add Ricotta, Capers and Herbs to Pasta and mix again.
  5. Don’t forget to S&P to taste! 
There you have it…MMP-Mish Mash Pasta!

Saturday, September 4, 2010

Mac Attack!

So, ok, I eat a lot of pasta, as there is definitely a pattern in most of my posts. This post is no different, but I hope in this case, it will give you ideas on “Food to Go” or “Fast Food” for the whole family. It’s all about making something ahead of time, portioning it out and storing it for those meals to take to work, a snack for the kids after coming home from school or even late night eats.

I don’t think I have ever met anyone who doesn’t love one of the greatest comfort foods of all time, Mac & Cheese. Yeah, yeah, it’s not the healthiest food around, but if it’s in moderation, like all other things in life, indulging yourself every once in a while shouldn’t make you feel guilty.

About twice a year I make myself a “family sized” batch of homemade Mac & Cheese. I have this great recipe I found in Saveur Magazine many years ago and never looked at another recipe again (well that’s not entirely true).

Now you may be asking, since I am single why make so much for myself?

Well, the main reason is that I know that I can portion it and then store each portion in the freezer for when I have that cheesy craving in about 5 minutes. If I decide to take a portion to work, it will thaw by lunch time and I can nuke it for just 2-3 minutes.

That’s less time than if you made a box of the store bought “blue box” or a family sized portion of the frozen “orange box”! The only major difference is that you took one day out of a 6 month timeframe to prepare the dish that can last you several. And I must say, it still only takes about 40 minutes to prep and cook all together.

That is the great reward for planning out meals. BTW Did you all even know that you can freeze your Homemade Mac & Cheese? A 9X11 or 8X11 baking dish will yield about 8 to 10 servings and lasts me about 3, 4 or even 5 months. For Snack portions you may even get 12-14 servings! That’s why I only make 2 batches a year! But those with family members of 4 or more, I would suggest making 2-3 batches of Mac & Cheese, so then you will have plenty in the freezer for all that get the craving. If packaged properly in the freezer, it’s there for the taking in individual servings!

So here is my favorite Mac & Cheese recipe I always turn to…Obviously, you can omit the spicy spice and substitute whole milk for 2% or Heavy Cream to Half & Half or Light Cream. Try different cheeses like Gruyere, Emmentaler, mix different cheeses like Parmesan and Cheddar or Gorgonzola and Emmentaler, Gruyere or Cheddar, whatever your cheese taste buds desire.

So, in the recipe, you want to get Ditalini for the “Tube” Pasta, but it was not available for me at the time, so I used Conchigliette (baby shell pasta). If either types of pasta are not available, you can always use the good ole Elbow Macaroni standby or any other small pasta that the cheese sauce will stick to. Half sized rigatoni or even small penne will work too. But don’t go with the smallest of small pastas like Orzo or Farfamille as that would be way too dense and not work.

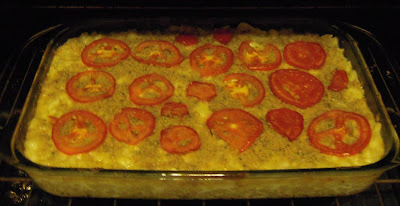
I also added some thinly sliced tomato on top, as this was a childhood favorite memory when my father/mother baked homemade Mac & Cheese for the fam. As the "tomato thief", I love that addition to my mac, the tomato adds a nice sweetness that you don’t expect with each bite.

So from the oven:


SAVEUR Macaroni and Cheese
This grown-up version of a childhood favorite is a great way to satisfy that deep-seated yearning for melted cheese.
  • 8 tbsp. butter
  • 6 tbsp. flour
  • 1⁄2 tsp. cayenne pepper
  • Salt and freshly ground white pepper
  • 3 3⁄4 cups hot milk
  • 4 cups grated cheddar
  • 1 lb. short macaroni, cooked
  • 1⁄2 cup heavy cream
  • 1⁄2 cup fresh bread crumbs 
  1. Preheat oven to 350°. Melt 6 tbsp. butter in a medium stainless-steel saucepan over low heat. Add flour and cook, stirring constantly, for about 4 minutes (flour mixture must foam as it cooks, or sauce will taste of raw flour). Stir in cayenne and season to taste with salt and pepper. Whisk in hot milk, 1/2 cup at a time, and cook, stirring, until sauce thickens. Reduce heat to low and stir in 2 cups of cheese. Cook, stirring, until cheese melts, about 2 minutes.
  2. Combine pasta and sauce in a large bowl, and season with salt. Sprinkle 1/2 cup cheese over the bottom of a buttered 8" × 11" baking dish. Place one-third of the pasta in the baking dish, top with 1/2 cup of cheese, then repeat, layering pasta and cheese, ending with cheese, making three layers in all.
  3. Pour cream over assembled macaroni and cheese. Melt remaining butter in a skillet. Add bread crumbs, coat with melted butter, and sprinkle over macaroni and cheese. Bake until crust is golden, about 30 minutes. Allow to rest for 15 minutes before serving. 
IMPORTANT - Freezer Storage Options:

FULL BATCH OPTION: You can freeze the entire batch, but if you do, DO NOT BAKE!  Freeze pre-cooked!!!  When ready, take out for cooking, if in Glass/Pyrex, let the glass come to room temperature, if in metal, it is ok to put directly in oven.  Bake for approximately 40-50 minutes at 400 degrees, not 350 as stated above.

PORTION OPTION:  After baking, cool as per the original instructions, then put in refridgerator for 4 to 24 hours to set.  Then portion out the Batch and seal each serving in individual freezer bags.  If you have one of those vaccuum pack devices, even better!  When ready to eat, take a serving/portion and nuke for approx 5 minutes, even if frozen solid.  If the portions are smaller then I would say about 3 minutes in the nuke machine.  Nuke timing will depend on your Nuke Model.

I hope I have given you some ideas on planning and storage for at least one of the best comfort foods out there.  So, even for all of us that are single, it's ok to make a family batch of food, as long as you can portion and store it properly in the freezer for later eats!  Planning will save you time!!!

Monday, August 16, 2010

Crazy and not so Lazy Sunday and a Pasta Treat!

So, I’m still not really working and I have so many hours in the day/week/month to accomplish things. And I do keep busy, but there are some days, where you really feel as if you accomplished more than normal. This past Sunday (08/15 actually), I felt like I just hopped, skipped, jumped and went overboard with being productive on what generally is considered a luxury/lazy day off.
 
I actually woke up later than usual today around 10 am just in time to catch Christiane Amanpour on This Week (I think she is doing a fabulous job BTW). I wasn’t really “Feeling” it, meaning I woke not feeling all that energized and any real plans for the day, but I watched This Week and wondered how I am going to manage being a couch potato tonight, since all my favorite TV shows just happen to overlap from 9-11 on 4 different channels! 8 pm shows are a gamble, as Nature on PBS airs, but if it’s an episode I’ve seen, Big Brother wins out…Tonight the Golf Game on CBS made the decision for me.
  • ABC-Scoundrels 9 pm
  • TNT-Leverage 9 pm
  • AMC-Rubicon 9 pm
  • HBO-Hung 10 pm
  • HBO-Entourage 10:30 pm
  • AMC-Madmen 10 pm 
How much does it suck that all the good shows right now are all on Sunday Night? I can’t afford a DVR right now and some of the channels seem to be a bit lazy these days and not posting full episodes on-line or On Demand until the day of a “new” episode (TNT) or removed (AMC) all full episodes entirely for some odd reason. This has truly frustrated me, as I will have to stay up until 1 am to watch all my favorite shows and still manage to miss one of them, but ABC and HBO at least posts their episodes the next day online or On Demand. Thank you ABC & HBO! AMC and TNT-Get your SH*T together!
 
This brings me back to my original set up, which is the great feeling of being more productive than usual. I had a slew of things to get done, which was all about the right timing except for one major chore. So, I hadn’t really been putting things off, I knew what I needed to complete was coming and today was the ultimate day! I will say having a feeling of such accomplishment really brings up the morale and boost of energy.
 
I started with the dishes, which was the one chore I had ignored for a few days, but I went further and cleaned out my fridge and freezer, refilled all the empty seltzer bottles (8 in all) with fresh water for future refills of my 2 Brita pitchers (I know, not that big a deal).

I have cats and they can occasionally spit up those fur balls, and whattya know, they both had the urge while I was sleeping, yeah disgusting, but that got me cleaning my floors, not that they were that dirty anyway…except for their intestinal mess.
 
I took out the Fridge/Freezer and what I had for recyclables to the garbage. Walked around the block (Queens has longer blocks than Manhattan). Watered my new Basil plant I purchased on Saturday, because I am sick of buying Basil that rots in 24 hours and wasting money I just don't have. Actually found a weird little albino bug on one of the leaves, not sure what it was, but I killed it.
 
I also updated my resume, re-posted it on all those well known sites, I started building/developing an Access DB for an Arts Non-Profit Organization that will help automate their Vendor Sales Reports and even Data Entry processes and am writing this post! Looked up all inclusive Spas in the vicinity for my Bodega Family, the daughter is getting married in Mid September. I called my mother, took pics of the food for this post and cleaned them up with Photoshop.
 
BTW, I usually take about 20-30 pics of my food and then choose the best pics and I rarely modify them…meaning that I do not enhance color or layer in details. On very rare occasions I will use the Auto Level for Brightness, if it happens to be a dark day or remove a spec (a spec on the plate, but not on the food) that shouldn’t be there. All other modifications to my pics are cropping and resizing for web only. So what you see is what I eventually eat and if you are lucky, you get to eat it too!  And YES, I do pretty up my food even if it's serving just me.  I figure why should I not give myself the experience!?
 
On to the cooking and other stuff…With all my dishes scrubbed and cleaned, it was time to make some Lemon Simple Syrup for my individual Lemonade fix (I made 2 glasses). I will have a separate post for this. I made a new batch of Chicken Broth, part to use for the Pasta treat and the rest to freeze for another food concoction. Earlier during the day I had already put together the instructions for the pasta treat.
 
So, have I tired you out yet? I would think even for myself, I would be exhausted and even reading this post over; I must be some mad person trying to take on more than I can chew! So, since I’ve been so productive today, it’s time to make the treat I deserve and so I did.
 
Are you ready? Are you hungry now? Time for Orecchiette, Peas, Sweet Sausage, Mint & Creamy Ricotta!
 
To note on the ingredients, I did not opt for a spicy Sausage, because I felt at the time of purchase it would hold up with the Mint better. However, after making and tasting this dish, the mint would hold up with the spicy sausage, as long as it’s fresher than fresh. So, if you opt for spicy sausage, make sure your mint is extra fresh! I would not choose a sausage like Chorizo, as that would overwhelm the mint, and Cilantro would be a better addition.


Orecchiette (Italy's little ears), Peas, Sweet Sausage, Mint & Creamy Ricotta
Serves 4-6 as a Main Dish, 6-12 as an appetizer
  • 1 Lb Orecchiette Pasta
  • ½ Lb Bulk Sweet Pork Sausage (about 3 links, remove casing) **can use any sausage you like**
  • 2-3 Cloves Garlic finely chopped ( I use 4-6 personally)
  • 10 Oz Peas
  • 2 cups Chicken or Vegetable Broth
  • Grated Parmesan Cheese (about a few tablespoons)
  • 16 Oz Fresh Ricotta
  • About a Handful of Fresh rough chopped Mint
  • S & P to Taste
Preparation:
  • For Pasta, follow package directions, however make sure you remove/drain you pasta just before Aldente. About 1 to 1 ½ minute.
  • In a hot fry pan, add a few tablespoons of Extra Virgin Olive, add garlic and sautee for a few moments. Add Sausage to pan, break up and sautee until cooked through. S & P to Taste
  • Add Broth to fry pan and let reduce, add peas and pasta, cook for about one to two more minutes until the rest of the broth has been soaked up by the pasta.
  • Stir in parmesan cheese to taste (this will help thicken the extra liquid to a sauce)
  • Place pasta in individual bowls and add a dollop of Ricotta on top, sprinkle fresh mint leaves and serve.
Manga!

Friday, August 6, 2010

Basil Bliss

Basil is another one of my favorite foods/herbs; the perfect complement to my personal red/orange/yellow/green or multi color Tomato bliss. I think you might imagine my next favorite, but that’s another blog, but I will say it’s always white and should be consumed fresher than fresh. ;)

There is nothing that I can think of, except maybe…hmmm, I can’t think of anything, Basil can’t go with. Now keep in mind, there are several varieties of Basil, so if you want to challenge Basil's infinite use, use it as a desert garnish, choose the right variety, like sweet or lemon basil. Choose the right basil for cooking and/or drinking liquids.

I realize that Sweet is the most common, but if you have access to the various types, use them accordingly.  How tasty would a Lemon Basil sorbet be?  I quiver with enjoyable passion of the amazingly tasteful exotic flavor.

I can tell you if you choose Sweet (which is most commonly found) or Lemon Basil, this is excellent in mixed drinks that may generally call for Mint; if you are serving a spicy drink, more spicy Basil is appropriate, like Spicy Globe or Purple Ruffles.

About a year or more ago, I went out with my co-workers after I was recently let go and we met up at this bar that served a mean Pear and Basil Martini. The bar treated the drink like a Mohito, by muddling sweet basil instead of mint, served up in a martini glass. I remember that I kept asking the bartender to add more basil to my drink until it became more basil than pear and vodka because I love Basil no matter what! The Bartender thought I was crazy!

One suggestion is a twist on the tried and true Bloody Mary-We all think that Celery is a great munch, and that should not go away as the primary green for the Bloody Mary, but if you are a spicy person, muddle in some spicy Basil as an extra special addition to give your Bloody Mary a more special kick your guests will be talking about.

Hey, a Bloody Mary is essentially Tomato Based, so adding its herbal significant other can’t hurt and not make it taste like spaghetti sauce. Remember, you’re not adding oregano or marjoram and garlic, which would ultimately make a drinkable tomato sauce concoction (which wouldn't really be that outlandish and very tasty).

But, today is about Pesto, an amazing mash of Basil, Parsley, Olive Oil, nuts, cheese and additional herbs. I learned to make Pesto the old school way, originally in a mortar, but now that I own a food processor, it makes life so much easier. So I won’t subject any of you to that old world method.

There are several ways to make pesto, and not all of them need to be basil centric, but to me, the best pestos are basil dominant. Not all pesto’s need to have cheese either; my recipe this round/post is dairy free, although my pics do show slivers of cheese as a garnish only.

The one thing to note is that this is so easy to make and if you’re a person that buys that store bought stuff, you’re really missing out on the true taste of homemade fresh pesto. I will admit, on short notice, store bought pesto’s are for just that, last minute-short notice, but honestly, if you compare freshly made to store bought, you will notice the difference. For the time it takes for you to pick out pesto ingredients to the “Pre-Made Brand”, you could have made your pesto at home 2 fold.

One major difference is that homemade, you can mix it up. You can add more or less of each of the ingredients. You are not bound to what the store bought brand has sold you. You can add different herbs for different flavors and taste that will compliment your meal or appetizer. This is why I highly suggest you start and learn to make your own.  Remember, making Pesto homemade will cost you much less than if you purchased it for a quicky to get out of cleaning extra dishes or save time on your overall meal prep.

Let's just say you are making boxed pasta, the cook time is about 8-9 minutes for "aldente".  Within the 8-9 minutes, you can make pesto in about 3-4 minutes, while the pasta is cooking.  A min or 2 to peel/crush the garlic, set up the Blender or Food Processor, add the rest of the ingredients and 1-2 min to process.

Homemade Pesto, will last in your fridge for about 5 days or more and is also freezable up to 1-2 months (honestly I’ve kept homemade pesto for 2 weeks in a tight lid container in the fridge).

BTW: The cracker in the pics are a multigrain brown rice “thin cake”. I found these in my local organic market a week or so ago…Again, I am not one to promote, but these snacks are better than the thick Rice Cakes we all think and are familiar with at the supermarket. They are a product of Belgium; Suzie’s Thin Cakes. Gluten, Cholesterol, Fat and Sugar free and they are quite yummy.


Basil Mint Pesto
  • 1 Bunch Fresh Basil
  • ¼-1/3 bunch Fresh Italian Parsely (about a handful)
  • ¼ bunch Fresh Mint (about a ¾ handful)
  • 3 Cloves Garlic (medium sized) If you are a garlic freak like I am, add 1 more.
  • 6 oz of Pine Nuts or about a handful
  • About 1/8 to ¼ cup of Extra Virgin Olive Oil (Please use the good stuff for this)
  • S&P to Taste
  • Optional: ¼ cup Grated Parm Cheese 
Add Basil Leaves, Parsley, Mint Leaves, Garlic and Pine Nuts, and Cheese (Optional) to Food processor or Blender; Pulse until a medium rough chop. Slowly drizzle in Extra Virgin Olive oil (you may not need all of it)…you should process until ingredients are well blended; pesto should not be too “wet” and should have a consistency of say, a thickened vinaigrette minus the vinegar. Do not over process! You do not want a Puree! You want to see the herbs!

Ideas on mixing it up with Pesto:
  • For Nuts Try: Almonds or Walnuts or Pecans or Cashews or hazelnuts
  • For Herbs Try: Tarragon or Marjoram or multiple varieties of Basil or Cilantro or Lavender
  • For Cheese: Any Hard Grating cheese will work; Grana Padano or Pecorino Romano or Asiago
  • Other Thoughts: Sun Dried Tomatoes or Flavored Olive Oils or Roasted Garlic or Roasted Shallots or Roasted Peppers. 
Pesto for simple and quick dishes:
  • Mix in with your favorite Pasta or even Rice as a primary sauce
  • Mix in with your favorite Tomato Sauce for an extra kick!
  • Replace Mayo or Mustard on Sandwiches, Pasta and Potato Salads
  • As per the Pics above, use as a base spread for Appetizers
  • Use as a “Dip”
  • Add to Mashed Potatoes for extra flavor
  • Even mix in with soups
 As Lidia would say “Tutti A Tavola A Mangiare!”

Monday, August 2, 2010

Risotto-PLBTG

Pancetta (P), Leeks (L), Bursting Tomatoes (BT) and Gorganzola (G), what more can you ask for in dish! I love risotto as much as love cooking it, and who doesn’t love the idea of taking an old BLT concept to an Italian rice dish!

I am going to be short and sweet on this post…I think I said all I can say about Risotto in one of my previous posts: Risotto Done in my Italian way

So, if you read my previous post on cooking risotto, you should be comfortable making different versions of this incredible dish.

Risotto with Pancetta, Leeks, Bursting Tomatoes and Gorganzola
Serves 4-6 as a main meal-can serve up to 6-8 as an appetizer
  • 2 c Arborio Rice
  • 2 Medium Leeks-Cut into ½ in slices and fully washed
  • 2-3 cloves Garlic Minced
  • A few Tbls of Extra Virgin Olive Oil
  • 1 Slice ½ inch Thick Pancetta (If you use Bacon, use about 2 extra thick slices) About 1/3 cup.
  • 12 Oz Cherry Tomatoes
  • ¼ cup Gorgonzola-Crumbled or if you like Soft.
  • 6-8 Cups Broth (you can use Vegetable or Chicken-I have used Homemade Chicken Broth for this Version)
  • 1-1/2 c Dry White Wine (Pino Grigio or Chardonnay-Buy what you would drink)
  • S/P to taste **Note if using Bacon be careful on the salt**
  • Basil-Chiffonade for Garnish 
Make sure you have all your ingredients prepped ahead of time. It will make the process easier.

Step 1: Cut your Leeks and Garlic and set aside
Step 2: Cut your Pancetta into small cubes
Step 3: Heat up your Broth in a separate pan and keep it on a very low setting to keep it hot.
Step 4: Prep your Tomatoes: In a fry pan, add some EVOO and Tomatoes over medium heat, cover and let tomatoes cook until a bursting stage…about 8-10 minutes. Set aside covered to maintain heat. –You do not want to add to rice as you are cooking it, as the tomatoes are at this point very delicate.

***This is now where you should not leave the pan at anytime***

Step 6: Pre-Heat a Large Fry pan or Dutch Oven over medium heat. (for Risotto newbies…I mean a Large. The rice will double in size as its being cooked)
Step 7: Add Extra Virgin Olive Oil and Pancetta. When Pancetta has slightly browned add Leeks and Garlic and sauté for about 5 minutes until Leeks have melted properly.
Step 8: Add Arborio Rice and sauté for another 3-4 minutes. Cook, stirring until rice becomes opaque in color.
Step 9: Add White Wine and continue to stir rice until all liquid has dissipated/soaked into the rice
Step 10: Add 1 ladle or 1 cup of Broth for each interval, continually stirring the rice and liquid…Meaning add 1 ladle or 1 cup of Broth and stir until all liquid has dissipated/soaked into the rice, then add another ladle or 1 cup of Broth…Continue this process until you get to about the 5th ladle/cup. Your rice at this point should start to have a starchy milky look to it. This is good, as Arborio rice should have that starchy milky liquid.

***IMPORTANT***

Now for the first taste test…The Rice should be Aldente-“To the Tooth”…Which means that the rice should have a little bit of a bite, but not too much. You want the slightest resistance of the rice. If your rice is still crunchy that you can taste the crunch more than the rice itself, you will need to add more liquid. At the 5th Ladle/Cup, you should start to taste. Make sure you keep on tasting prior to each broth addition from this point on!

Step 11: Continue to add the remainder of your broth (you may not need to use all of it) until rice is done and turn heat off.
Step 12: Add Gorgonzola cheese…Stir until everything is incorporated or until cheese has melted.
Step 13: Serve Risotto, and add a few Tomatoes on top of rice and Basil as the garnish.

Cin Cin!