Showing posts with label Vegetables. Show all posts

Monday, August 16, 2010

Crazy and not so Lazy Sunday and a Pasta Treat!

So, I’m still not really working and I have so many hours in the day/week/month to accomplish things. And I do keep busy, but there are some days, where you really feel as if you accomplished more than normal. This past Sunday (08/15 actually), I felt like I just hopped, skipped, jumped and went overboard with being productive on what generally is considered a luxury/lazy day off.
 
I actually woke up later than usual today around 10 am just in time to catch Christiane Amanpour on This Week (I think she is doing a fabulous job BTW). I wasn’t really “Feeling” it, meaning I woke not feeling all that energized and any real plans for the day, but I watched This Week and wondered how I am going to manage being a couch potato tonight, since all my favorite TV shows just happen to overlap from 9-11 on 4 different channels! 8 pm shows are a gamble, as Nature on PBS airs, but if it’s an episode I’ve seen, Big Brother wins out…Tonight the Golf Game on CBS made the decision for me.
  • ABC-Scoundrels 9 pm
  • TNT-Leverage 9 pm
  • AMC-Rubicon 9 pm
  • HBO-Hung 10 pm
  • HBO-Entourage 10:30 pm
  • AMC-Madmen 10 pm 
How much does it suck that all the good shows right now are all on Sunday Night? I can’t afford a DVR right now and some of the channels seem to be a bit lazy these days and not posting full episodes on-line or On Demand until the day of a “new” episode (TNT) or removed (AMC) all full episodes entirely for some odd reason. This has truly frustrated me, as I will have to stay up until 1 am to watch all my favorite shows and still manage to miss one of them, but ABC and HBO at least posts their episodes the next day online or On Demand. Thank you ABC & HBO! AMC and TNT-Get your SH*T together!
 
This brings me back to my original set up, which is the great feeling of being more productive than usual. I had a slew of things to get done, which was all about the right timing except for one major chore. So, I hadn’t really been putting things off, I knew what I needed to complete was coming and today was the ultimate day! I will say having a feeling of such accomplishment really brings up the morale and boost of energy.
 
I started with the dishes, which was the one chore I had ignored for a few days, but I went further and cleaned out my fridge and freezer, refilled all the empty seltzer bottles (8 in all) with fresh water for future refills of my 2 Brita pitchers (I know, not that big a deal).

I have cats and they can occasionally spit up those fur balls, and whattya know, they both had the urge while I was sleeping, yeah disgusting, but that got me cleaning my floors, not that they were that dirty anyway…except for their intestinal mess.
 
I took out the Fridge/Freezer and what I had for recyclables to the garbage. Walked around the block (Queens has longer blocks than Manhattan). Watered my new Basil plant I purchased on Saturday, because I am sick of buying Basil that rots in 24 hours and wasting money I just don't have. Actually found a weird little albino bug on one of the leaves, not sure what it was, but I killed it.
 
I also updated my resume, re-posted it on all those well known sites, I started building/developing an Access DB for an Arts Non-Profit Organization that will help automate their Vendor Sales Reports and even Data Entry processes and am writing this post! Looked up all inclusive Spas in the vicinity for my Bodega Family, the daughter is getting married in Mid September. I called my mother, took pics of the food for this post and cleaned them up with Photoshop.
 
BTW, I usually take about 20-30 pics of my food and then choose the best pics and I rarely modify them…meaning that I do not enhance color or layer in details. On very rare occasions I will use the Auto Level for Brightness, if it happens to be a dark day or remove a spec (a spec on the plate, but not on the food) that shouldn’t be there. All other modifications to my pics are cropping and resizing for web only. So what you see is what I eventually eat and if you are lucky, you get to eat it too!  And YES, I do pretty up my food even if it's serving just me.  I figure why should I not give myself the experience!?
 
On to the cooking and other stuff…With all my dishes scrubbed and cleaned, it was time to make some Lemon Simple Syrup for my individual Lemonade fix (I made 2 glasses). I will have a separate post for this. I made a new batch of Chicken Broth, part to use for the Pasta treat and the rest to freeze for another food concoction. Earlier during the day I had already put together the instructions for the pasta treat.
 
So, have I tired you out yet? I would think even for myself, I would be exhausted and even reading this post over; I must be some mad person trying to take on more than I can chew! So, since I’ve been so productive today, it’s time to make the treat I deserve and so I did.
 
Are you ready? Are you hungry now? Time for Orecchiette, Peas, Sweet Sausage, Mint & Creamy Ricotta!
 
To note on the ingredients, I did not opt for a spicy Sausage, because I felt at the time of purchase it would hold up with the Mint better. However, after making and tasting this dish, the mint would hold up with the spicy sausage, as long as it’s fresher than fresh. So, if you opt for spicy sausage, make sure your mint is extra fresh! I would not choose a sausage like Chorizo, as that would overwhelm the mint, and Cilantro would be a better addition.


Orecchiette (Italy's little ears), Peas, Sweet Sausage, Mint & Creamy Ricotta
Serves 4-6 as a Main Dish, 6-12 as an appetizer
  • 1 Lb Orecchiette Pasta
  • ½ Lb Bulk Sweet Pork Sausage (about 3 links, remove casing) **can use any sausage you like**
  • 2-3 Cloves Garlic finely chopped ( I use 4-6 personally)
  • 10 Oz Peas
  • 2 cups Chicken or Vegetable Broth
  • Grated Parmesan Cheese (about a few tablespoons)
  • 16 Oz Fresh Ricotta
  • About a Handful of Fresh rough chopped Mint
  • S & P to Taste
Preparation:
  • For Pasta, follow package directions, however make sure you remove/drain you pasta just before Aldente. About 1 to 1 ½ minute.
  • In a hot fry pan, add a few tablespoons of Extra Virgin Olive, add garlic and sautee for a few moments. Add Sausage to pan, break up and sautee until cooked through. S & P to Taste
  • Add Broth to fry pan and let reduce, add peas and pasta, cook for about one to two more minutes until the rest of the broth has been soaked up by the pasta.
  • Stir in parmesan cheese to taste (this will help thicken the extra liquid to a sauce)
  • Place pasta in individual bowls and add a dollop of Ricotta on top, sprinkle fresh mint leaves and serve.
Manga!

Monday, June 21, 2010

Sardines Revisited

When I first started this blog, I posted a quick write up on how I love Sardines (Saltines and Omega 3) and the fact that I think they get a bad rep. I also posted a link to an Alton Brown, Good Eats recipe “Sherried Sardine Toast” that I had not tried out at the time, however recommended to folks who are willing to eat these lovely little fishes.

Well, I took the plunge and tested out this recipe and OH MY TASTE BUDS! The Alton Brown episode was extremely mouth watering, especially if you are a person who loves to eat sardines like me, but at the same time it does not do the justice it really deserves until you taste this wonderful snack/lunch and even more.

I personally had this tasty delight for what I call “Lupper”, the time between a late lunch and supper, which is generally when I eat, as I am not a big breakfast or for that matter a big lunch eater. I mainly see myself as a dinner hound and the occasional over the sink/counter eater.

Not to get off subject, but did you know that there is a difference between Supper and Dinner? Well, there was in my family according to my Nana on my father’s side. Supper was the feast between 4pm and 7pm on holidays and Dinner was any meals eaten a few hours later-between 7-9pm. Now…Don’t have a frenzy, I know this is backwards as the dictionary is Dinner first, then Supper. But hey, I loved my Nana (even though not that educated) and that’s how it was in my family.

So, back to the Sherried Sardine Toast…Again, WOW! I really think, if you are a person who may be a bit squeamish about sardines, to try this recipe out. The toast and the smooth buttery taste of the Avocado; with the initial splash of the sherry vinegar on the tongue really tones down the Sardine fishiness. I even believe that if the canned Brisling Sardines are still not something you want to be adventurous with, try just canned tuna in oil as a starting point. I might even try this with anchovies and add some small capers (not caper berries-but hey this could work too)!

So the pictures I have posted are not exactly the "Toast" the recipe calls for exactly, but at the time, I only had what I had.  So that should tell everyone that you don't necessarily have to have a boule to make this treat.  I used an italian long loaf of bread and cut it in long wedges, which is actually perfect for the snack/appetizer form which will yield 8 smaller slices instead of the bigger 4 the original recipe recommends.  For a more substantial meal, then use a thicker loaf of crusty bread as stated.

So, be adventurous for the rest of this month! This recipe is perfect for a Snack, Appetizer and if you are like me, perfect for “lupper” and a late night snack!  Just keep in mind, this is a recipe that does not store for more than the day you prepare it. Yes, you can make half (the toast should be prepared as you serve it)  for the early part of the day, but best make and eat the next half before the day ends.


Sunday, June 13, 2010

Cool your Cucumbers! Will ya?

Hi folks, sorry for the long delay in posting a recipe. Been kinda busy these days and like in my previous post, the foods I’ve been preparing and/or eating haven’t been all that exciting to write about.

As much as I love to cook, I still can’t figure out how all the chefs in the world can cook in such a hot environment through the summer months. Granted, you do lose a lot of weight, as it’s like being in a sauna somewhat, but try being in a sauna for eight or more hours straight. I know I can’t do it, that’s one reason I never went into the culinary arts profession.

With the real summer officially on the way soon (June 21st) and with more and more Hot and Humid days to come, cooking hot meals in the kitchen are just too much to take (FYI A Science Fact: After the Summer Solstace the Light loses 1 Minute a Day until the Winter Solstace, then the 1 Minute is gained again until the Summer begins again!). Eating hot meals in the summer months has somewhat always been a bit unappealing appetite wise for me and I am always looking to expand my main dish repertoire to cool and refreshing dishes that minimize the usage of heat.

I love using a grill, but I’m in an Apartment with no back yard to place a grill. All I’ve got is a grill/griddle to place on my stove top and even that generates a lot of heat, even with the AC on in my kitchen! If I can’t stand the heat, should that really mean I should get out of the kitchen? I think not and neither should you!

The other day I had been talking to one of my recruiters whom I gave my blog address to view my recipes. Turns out we had a lot in common when it comes to certain foods. She had checked out the Chilled Tomato and Avocado Soup and then we started discussing Russian foods, as she was from the Ukraine. She mentioned she had a few recipes for me, but I couldn’t wait and started looking for a Chilled Cucumber Soup recipe we had discussed, on my own.

So, my cold cucumber soup craving lasted for several days until I couldn’t stand it anymore…I found several recipes and like I usually do, take bits and pieces and modify. I can’t remember where I actually got this recipe from so sorry if I don’t provide an original link, but here is my modified version.

Please note this is not a “Dairy Free” recipe, but it IS a No Cook, No Bake recipe. However, you can substitute certain ingredients, which I will mention in the Ingredient list.
Chilled Cucumber & Dill Soup
Makes approximately 4 servings
Special Equipment: Either a large Blender or Food Processor.

Ingredients:
  • 1 Tsp Fresh Dill (You can use ½ Tsp dried if that’s all you have)
    • Note: You can switch the Dill out for other Herbs such as: Mint, Tarragon, or even Lemon Thyme for a very distinct flavor. If using fresh herbs, I opt for double the dry measurements.
  • 1 Tbsp Worcestershire sauce
  • 1 Tbsp lemon juice (One Medium Fresh Lemon)
  • 1/2 Tsp celery salt (can use Sea Salt, but the celery salt provides a distinctive flavor element Salt cannot)
  • 1/4 Tsp pepper or try white pepper only
  • 2 green onions, coarsely chopped
  • 3 medium cucumbers, peeled, seeded, and coarsely chopped
    • Note: I used Kirby Cucumbers as they are my favorite. I used a total of 9 Kirby’s, reserving 1 Peeled but not seeded for adding a chunky element to the soup
  • ¾ or 1 Cup of sour cream or plain yogurt
To Prepare is extremely simple…
  1. Add all ingredients in the order listed except for the Sour Cream/Yogurt to your Blender or Food Processor.
  2. Pulse the ingredients until fully puréed. Once puréed, add sour cream/yogurt and pulse until combined.
  3. Place soup mixture in a glass or plastic bowl (Metal bowls are not good storage for this type of soup) in the refrigerator for 4-6 hours (24 would be even better-especially if using dried herbs) until well chilled. BTW: This soup can last for at least 4 days in the fridge. I wouldn’t recommend freezing this.
  4. Serve with a sprig of the Herb of choice and I would even go as far as drizzling a fragrant Olive Oil if that fancies you.
Enjoy and eat Cool!

Monday, May 10, 2010

Corn & Shrimp Chowder: Completely on the Cheap!

I was sitting on the couch the other day on my computer; it was about 5pm when the local news was starting up. Usually at this time, I end up doing the dishes, as the local station I watch has 3 half hour sessions and each generally triplicates all the top stories that were aired at noon time (remember, I’m still not working). So doing chores for the first session isn’t a huge deal as I can catch up on the next 2 until World News with Diane Sawyer (whom I love as much as seeing/listening to Charlie Gibson and RIP Peter Jennings).
 
So, my local NYC station I watch does have a “local eats” segment (I think it’s the 5:30-6 show), which I sometimes find interesting. This particular day, it was about a restaurant in I think Brooklyn (wasn’t really paying attention to the area or restaurant for that matter) that makes exceptional Corn Chowder with Shrimp.
 
So that gave me an idea…and a major craving! ;). Most of my food exploits come from cravings, just so you all know!
 
Now, I love chowders, all kinds of chowders, but give it to me thick! Like NE Clam Chowder…Thick as Thieves or a Rich and succulent Lobster Bisque! My feelings and cravings for this is either the New Englander in me or the fact that I love dairy and white foods which are not all that healthy if you eat it on a regular basis (which I don’t anymore), but to me this kind of food is my sweet tooth and it is hard to turn away when put in front of me.
 
I’ve seen and eaten many “Chowda” recipes in my day, TV definitely has given overkill and restaurants are not as authentic as they claim to be. I must admit that Chowder Soups don’t necessarily have to be thick as what I was used to, but to me “Chowda” has to be rich in something and that is still a Dairy Product. Though, I will admit, if you want to trim the dairy, to maintain the richness and even thickness, a starch is necessary in my book, like using potatoes as a thickening agent as well as an overall chunky ingredient with much less dairy.
 
To get back to the news story I was half paying attention to. The story focused on a Corn/Shrimp Chowder recipe. I haven’t had corn chowder in so long and seeing the soup on TV gave me such a craving. So, I decided I needed to make Corn Chowder with Shrimp!
 
The killer here is that I don’t have a lot of money these days and even though those will say corn chowder is cheap to make, and it really can be, the bottom line is that you still have to plan to make this recipe, because when you buy the required ingredients, you have a lot left over (ingredients and final product) which may or may not store well for a long period of time, which ends up costing more if you don’t use them in another planned recipe or freeze.
 
I looked on the internet and found really great recipes for Corn Chowder and found one that I could definitely modify for really cheap eats and still have great taste and NO LEFT OVER INGREDIENTS (well the Half and Half can be used for Coffee)!

So if you have a craving for Corn Chowder with Shrimp, I have a great and cheap recipe for you! It only costs about 5-7 bucks for 4-6 servings (NYC Costs-other USA areas it’s probably even cheaper). If you are single or a college student looking to impress, this is an extreme bargain, as you can freeze 2 -3 servings for about 6 months!

Keep in mind, if you don't want the Shrimp, you can omit it.  This recipe is modified from another, which means, you can modify mine or the original recipe I used as a base.  I encourage everyone, that no recipe is set in stone and that you CAN make it your own and make it work based on any circumstance.  This Post is intended to show those who think they must follow a recipe step by step and think they cannot afford the ingredients that they can make a positively great recipe, on a budget by modification to their means.

So here is the link to the Original Recipe I modified from: Creamy Corn Chowder

Cheap Eats: Corn Chowder-Just the Basics-By Have A Seat
Serves 4 to 6.

Ingredients:
  • 2 tablespoons butter
  • 1 Medium White onion Chopped Finely
  • 1 pound potatoes (about 3 medium), peeled and diced into 1/2-inch-thick pieces
  • 4 cups Canned Corn (not Creamed Corn), Approx 3-4 – 15oz Cans ( I used 3 cans)
  • 3 bay leaves (Dried) If Fresh 2 bay Leaves
  • Juices/Water from 2 ½ Cans of Canned Corn (keep in mind the juice has salt in it)
  • 2 Cups Water
  • 1 ½ cups Half and Half
  • ¼ Tsp Cayenne Pepper
  • Salt and pepper
  • 1 Can “Tiny” Shrimp
Instructions:
  1. In a large saucepan, melt the butter over medium-low heat. Add onions and cook, stirring occasionally, until the onion start to soften, about 5-10 minutes. Stir in the potatoes, 2 cans of the corn, bay leafs, and 2 Cups Water.
  2. Bring the mixture to a boil, then reduce the heat and keep it at a simmer for 10-15 minutes, stirring occasionally (Timing really depends on how thick your potato cubes are).
  3. Puree the 3rd can of corn and half and half in a blender or food processor, and then stir it into the soup. Simmer the soup until it thickens slightly, 5 to 10 minutes. Then add Cayenne Pepper to Taste and Canned Tiny Shrimp and simmer for another 2-3 minutes. Remove the bay leafs (optional) and add salt and pepper to taste.

Thursday, April 22, 2010

Beet the Blood Orange for Luv! It’s OK, It’s Earth Day!

I can’t remember when I didn’t love beets, but I am sure my parents would tell me otherwise. Beets are such an amazing vegetable, but I think they should call it a fruit as it is so full of sugar!

Did you all know that some commercial sugar products are primarily made of Beets? Almost half of the sugar we buy is made from beets. Yes, regular white sugar is not just from Cane Sugar, it’s from special sugar beets! Beets are an integral part of our food industry we would have never, ever thought about. This is why we should watch and read what the food industry puts forward, so we can change the overall process of foods we eat. I found out about the process of sugar from Modern Marvels, a truly great show about so many things!

No matter, red, yellow or tri color beets are a favorite of mine and I love them in very simple and flavorful meals. My first and foremost favorite is the classic borscht, cold of course, with a dollop of sour cream and the occasional boiled potato. I’m lucky that I live in NYC, as it would be harder to find classic Russian and Jewish foods without the best Deli’s in the world!

Back in the day, I found this grilled salad vegetable recipe, which I hope to post during the summer, included roasted beets from the grill, with many other exciting vegetable flavors that continually runs in the back of my mind. This grilled salad was the best I ever made and again, as time passes, I lost the original recipe, but this one is not so hard to forget. I do hope to make this soon, but as an Indoor Grill process.

So, we are in early spring and its Earth Day today! I have a great beet and blood orange salad that will satisfy everyone’s fanciful taste buds until the summer grill comes out. This is my concoction, but it can and should be modified to your taste. Realistically, this is all about the vinaigrette which can be used as a marinade or on other salad mixes.


Beet and Blood Orange Gremolata Vinaigrette
6 Servings

For Vinaigrette:
  • 2 Blood Oranges (Zested, and Juiced. Slice each in halves…Saving one half for Salad)
  • 3-4 Cloves Garlic (Smashed)
  • 1 Bunch Italian Flat leaf Parsley (Take Leafs Only)
  • 1 Cup Extra Virgin Olive Oil
  • 1 Tsp/Small Splash of White Wine or White Balsamic Vinegar
  • S & P to Taste 
Salad Ingredients:
  • 16 oz Baby Beets-Steamed and Peeled, Then Sliced
  • 1 Sm Pkg Pea Sprouts, 1 Pkg Mache-aka Lambs Lettuce (if not available…2 Pkgs Micro Greens )
  • Approx 10 small Artichoke Hearts (Not Marinated, can be canned or jarred or frozen)
  • 1 Sm Pkg Grape or Heirloom cherry Tomatoes (sliced in Halves)
  • 1 Can Hearts of Psalm (3/4 of Psalm cut in slices)
  • ½ Blood Orange Pulp/Sections (Left over from Dressing)
  • 2 oz Plain Goat Cheese (or Goat Cheese of your choice) Crumbled 
Blood Orange Gremolata Vinaigrette Prep:
  1. Grate/Zest Both Blood Oranges and set Zest aside. Juice 1 1/2 of the Oranges.
  2. Take Garlic and Smash, then chop roughly
  3. Take Parsley Leaves and chop roughly
  4. Add Blood Orange Zest, Garlic and Parsley and chop all ingredients together, finely. This becomes the Gremolata.
BTW-You can do Steps 2-4 in a food processor or blender. Just remember, ‘pulse’ until fine.
  1. Add Gremolata to a Bowl or Jar.
  2. For Jar, add Blood Orange Juice, Olive Oil, White Vinegar, S & P, close cap and shake vigorously.
  3. For Bowl, add Blood Orange Juice, Olive Oil, White Vinegar, S & P and with a whisk, mix vigorously and place in Fridge for approximately 2 hours. 
For Salad Prep…This is the easy part. There really is no order to placing the ingredients.
Just place the following in a large salad bowl:
  • Beets
  • Mache or Micro Greens
  • Artichoke Hearts
  • Tomatoes
  • Hearts of Psalm
  • Blood Orange Pulp/Sections
  • Crumbled Goat Cheese 
Finally, when ready to serve, add Blood Orange Gremolata Vinaigrette to desired taste, but only add minutes prior to serving or salad will wilt. Tip: The dressing goes along way and you don’t need as much as you think. When adding Vinaigrette, use a little at first and mix with clean hands. You definitely want to be delicate when dressing all the salad.

HAPPY EARTH DAY EVERYONE!!!!

Tuesday, April 13, 2010

I Confess! I was a Tomato Thief!

Of all the foods I have eaten in my life, the Tomato is to me the most endearing and favorite fruits/vegetables of all time (I call it a fruit). I eat heirloom, regular, cherry and grape tomatoes like candy! I am a sucker for homegrown heirloom Tomatoes of any variety and this story dates back to one of my earliest memories of one of my favorite foods of all my time. It’s a long post, but I promise an amazing recipe and hopefully a funny story will come out of it!

I think I was about 7 years old; the place was Newtown, Connecticut. My parents were still together and my sister was just someone I could bully, being the big sister that I was. We lived in a beautiful converted barn (yes it was painted red and the details white!) that stood on top of a U shape dip with what seemed to be a high hill at the bottom of the street where the best friends, at the time, of me and my sister lived.

There was a little creek (if looking at our street from the north) on the left bottom side of our U street in the back woods where my father would on rare occasions take us fishing for “so called trout” with stick poles and fishing string. All we ever caught were teeny minnows (I think) and the occasional frog and salamander.

On the upper right street, the house semi across from us, I remember always seeing Red Breasted Robins eating the worms and seeds from that front yard in the early morning. The house at the top of the street (between the inbound and outbound roadway and facing the main road) always had a great garden of Rhubarb every year. I think I remember the woman gave us some of her garden feast at some point. She must have, as I do remember Rhubarb Pie and other Rhubarb tastes like eating raw Rhubarb coated with sugar!

But on the far left middle side of our U shape street, there was a family/home that had a garden I was definitely more interested in. They had a garden of TOMATOES!!!! I think I remember the family that lived there, but not too sure. I want to remember it was the family who had this baby girl Megan (2 yrs old) who when us stupid kids asked her to say “Truck” she would say “F@#K”. Us kids at the time got a huge kick out of that (Hey, it was the late 70’s)!

No matter, this was MY GARDEN. My home had great stuff to pick from like peas, blackberries, pears, mulberries, crab apples and other stuff my father and mother planted. But not like this garden down the road. This garden was a plethora of tomatoes for me.

So, in early morning and late afternoon, I would sneak into this open garden and just pick the tomatoes from the vine and eat them trying to hide myself between the stalks/vines. I do remember being sneaky about being in the garden worried that someone would catch me. I remember going to the garden and just grabbing as many tomatoes as I could and running away and then devouring them before I went home. I did know I was doing something wrong, but I just loved those Tomatoes so much!

What I most remember aside from stealing the tomatoes is really about the fact that I just grabbed a tomato from the vine, and sunk my teeth into a most glorious fruit! As a child, I could not get enough of these Tomatoes; the taste to this day, when every bite into any tomato, it is hard for me to accept as I equate my taste bud memories to what I am eating presently.

When you taste that freshly picked fruit and just bite into it, there is no comparison to what’s out in the markets today. My buds tell me I must smell the vine on the fruit first, and then when you bite in like you would a peach its sweet…It’s so hard for me to explain, as it’s such a mind game for me. I am not sure I can give the tomato the justice I want to give it from my mind…there is no need for sugar or salt to bring out the taste as it’s all so natural to just eat it raw, just like a peach.

Well, that’s my story, I did try to keep it short, and hope you all enjoyed the read, but there is the real reason I started the discussion of Tomatoes. We are coming into spring and soon summer will be upon us. Yes, Tomatoes are best in July/August, but starting in May, you can start to purchase really great homegrown tomatoes. Please buy from your local farmer and not the supermarket!

As I mentioned on my other Page "What am I Cooking Next", I was going to cook for a special occasion and I did, just this past weekend. It was my Brother In-law’s B-Day. Technically, my sister and her bo are not married, but they have been together long enough for me to say he is definitely family. Because he is family and I have no money to really give him a proper gift, my gift is cooking. So I cooked a 3 course meal that included the Ravioli I posted a few days back, Soup and a Salad. The salad story will be posted soon.

My Brother in law mentioned to me that he was given last summer’s preserved tomatoes from his mother who resides in Indiana and that gave me the idea for a nice spring soup to prepare for him. So my sister is still on her vegan diet and I did try to search for a Tomato recipe that wasn’t salad based and I really did want to make a soup. I scoured the web and my cookbooks for a chilled tomato soup that was not dairy or bread based and wasn’t gazpacho.

I will tell you all, unless you really know where to look, real unique Tomato vegan recipes are hard to find. I am sure any vegan reading this will tell me otherwise. But I wasn’t just looking vegan, but a recipe any one would enjoy overall.

So I did ultimately come across a Chilled Tomato and Avocado Soup recipe, but it did require a dairy product. So, what I ended up doing is omitting the dairy and changing things up in the recipe. This resulted in a No Cook, No Bake, No Dairy, No Bread Recipe. I will link you to the original recipe I modified greatly from…In case you want the Dairy version. But I’ve got to say, my version is so much better and healthier for you overall.

NOTE: For the Tomatoes…I had the privilege of using preserved homegrown Tomatoes, but canned will work. For canned, be sure to remove the tomatoes to a glass bowl and chill for 24 hours to remove the tininess.

Original Recipe Link (BTW-There are many links of the same recipe out there, this is just one of them.)

My Chilled Tomato and Avocado Soup-Revised and more Original.
Makes approx 8 Servings

Special Equipment: Either a large Blender or Food Processor. If you have a Medium Blender, you may have to do this in batches. Using a Handheld Stick Blender doesn't work so well, but if that's all you have, then go for it!
  • 32 Ounces Whole Canned or Preserved Tomatoes with Juice
  • 1 Large ripe Tomato (Beefsteak or Ugly Heirloom) or 2 Medium Hydroponic Vine Ripened Tomatoes-Roughly quartered
  • 4 Ripe Avocados (2 should be quartered/sliced for the soup base)
  • 1 Medium Onion-Roughly quartered
  • 1 Large Red Pepper or 2 Med Red Peppers-Roughly quartered
  • ½ Cup Lemon Juice (Real Lemons-No Lemon Substitutes)
  • ½ Tsp Cayenne Pepper
  • 1 Bunch Chives
  • S & P to Taste
  • Optional: Fruity or Spicy Extra Virgin Olive Oil
Preparation:
  1. Add ¾ of the Canned/Preserved tomatoes (Reserve ¼ of tomatoes), Fresh Tomato, Avocado, Onion, Red Bell Pepper, and lemon juice to Blender/Processor
  2. Puree until smooth.
  3. Transfer Tomato and Avocado mixture to large bowl.
  4. Take canned/preserved tomatoes and roughly chop keeping the pieces bites size, but not too small. Whisk in remaining canned/preserved tomatoes to Tomato and Avocado Mixture.
  5. Season with cayenne, salt and pepper to taste and chill for 2 to 24 hours.
  6. Garnish individual servings with remaining Avocado (Sliced), chopped chives, and optionally a drizzle of Extra Virgin Olive Oil.

Saturday, April 10, 2010

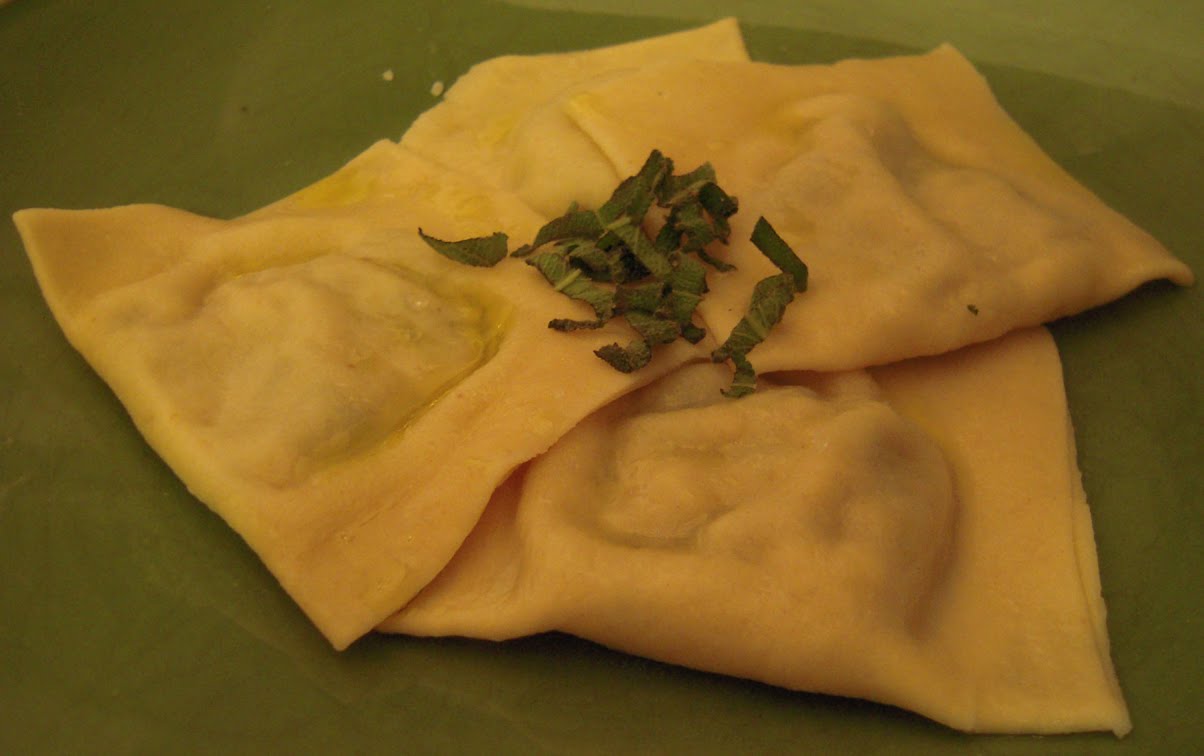
Ravioli That Brings the Forest to You

Years ago, I had been given the opportunity by my mother and step father to cook a few appetizers for some special occasion. I cannot remember exactly which occasion it was, but as someone who was trying to find new and updated recipes, I in my controlling enthusiasm, had to dictate what I would prepare.

Now, at the time my parents gave me this opportunity, their budget was fairly reasonable and tolerant of my quest to attempt new recipes and expand my culinary talents. All recipes had to be within a reason, but I will say, if it weren’t for my family’s appreciation and support towards my cooking hobby, I would not have come up with this ravioli recipe. Keep in mind, I also had to figure in a vegetarian dish due to my sister’s and other guest’s needs.

The original recipe was really something I found in one of the major cooking magazines, can’t remember which one, and was a recipe for a Phyllo Dough appetizer that was a plethora of Wild Mushrooms, Herbs and Goat Cheese. When I made the Phyllo Dough recipe, it was so awesome. I could not believe how good it was. But, as I loved this recipe, the filling was really the star for me, although the Phyllo was such an amazing compliment. Because I had such a craze for the filling, I thought it would be a great filling or ravioli.

So, I decided one day to prepare the filling as per the Phyllo Dough recipe and use it as a filling for my homemade ravioli. Not only did this work with the pasta, it was such an amazing taste in Ravioli, I had never seen or tasted from any Nuevo restaurants I have eaten at. To this day, after about 15 years later, I still have not seen a ravioli recipe like I am about to post. I have also not seen this recipe in print, specifically for ravioli or even any other recipe other than what I discovered years ago with the Phyllo Dough.

So any of you reading this, this is truly a new recipe that I am aware of. I consider this one of my major accomplishments of recipes of my own doing and I hope that all of you will enjoy this treat! What you should all take away from this recipe and post is this is really about the filling. Think about other recipes you have made which call for a “filling”. Experiment and consider standard Filling recipes as just a Filling and try it with other recipes that call for “Fillings” to go along with other cooking methods.

A few things I must state about the Ravioli Recipe:

The best way to serve is with a drizzle of REAL Black or White truffle Oil and S & P and a light sprinkle of Parm Cheese Only. If you can afford it, shavings of REAL White or Black Truffles along with its complimentary oil is best. Top with a chiffonade of fresh Sage.

However, if you on the cheap, a drizzle of Extra Virgin Olive Oil, S & P and a light sprinkle of Parm Cheese will be just as tasty (which is on my budget these days). Top with a chiffonade of fresh Sage.


Pasta Recipe 2lbs (or use your personal one).
Will make about 34-35 Large Ravioli (about 2x2).

I will not go into methods of making the pasta. You can attempt 2 ways… By making a flour well and mixing all the wet ingredients by hand or use a Food Processor which will cut your kneading time in half.
  • 2 C AP Flour
  • 1 C Semolina Flour
  • 1 ½ Tsp Sea Salt
  • 4 Large Eggs (Room Temp)
  • 1Tbls Extra Virgin Olive Oil 
Mushroom Filling 2-4 Lbs of Pasta (can be prepared 1 day ahead)
  • 8 oz White Button Mushrooms-Chopped/Diced
  • 3.5 oz Shitake Mushrooms-Chopped/Diced
  • 8 oz Baby Bella Mushrooms or 3-4 medium Portabella Caps-Chopped/Diced
  • 3.5 oz: Oyster Mushrooms-Chopped/Diced
  • 1 Small Onion-Chopped/Diced
  • 3 Large Garlic Cloves-Chopped/Diced
  • 2-3 Tbls Fresh Rosemary-Chopped
  • 2-3 Tbls Fresh Oregano-Chopped
  • 2-3 Tbls Fresh Sage-Chopped
  • 2-3 Tbls Fresh Thyme-Chopped
  • 2-4oz Packages of Plain Goat Cheese At room Temperature
  • ½ C Dry White Wine
  • 2-3 Tbls Extra Virgin Olive Oil
  • S & P to Taste 
In a large skillet on medium heat add Extra Virgin Olive Oil, Onion and garlic and sauté until onions are slightly translucent.

Add all mushrooms to skillet and continue to sauté until mushrooms start to sweat a little. Add White wine, S & P to taste and cook mushrooms until all liquid is gone.

Transfer mushroom mixture to a mixing bowl and let cool for about 5 minutes. Then add goat cheese and herbs and mix until well incorporated.

Chill mixture for 3-4 hours or overnight for filling to set.

Once the mixture is chilled, prepare your pasta dough in single sheets and add about 1 ½ Tbls of mixture onto dough and cover with a second pasta sheet or if the pasta sheet is wide enough, fold over, sealing with egg wash.

The ravioli can be frozen for later use or you can cook it right away.

Wednesday, March 17, 2010

I swear it was not a "Dis"

Ok, most of you read my blog: Food Traditions-Bodega Style and may have thought based on my comments in the 3rd paragraph regarding my sister's diet, I dissed her in some way or another.

Sorry if my comments alluded to that, but I never meant to "dis" her in any way. My sister is a vegetarian as well as her boyfriend. I fully respect their dietary choice and if you asked them personally, I always, when planning a feast consider them more than the meat eaters in the family or the desire of friends or my appetites.

It just so happened that I mentioned her in a sugary sense.  My sister loves sweets more than an I and I was only reflecting the fact that I knew that she would not want to be tempted by sugar and if I did tempt her, it should be more organic and vegan in nature as a better option.  Not that she would refuse any sweet offerings from me in any sense, I understand that she would rather refrain and go for a healthier version if offered.

The fact that my sister is a vegetarian (will eat fish occassionally), comes as a great challenge to me as a cook.  For a person who always learned to cook meat and meat based recipes, I now have to learn to cook those same family recipes without a poultry or meat base for her and her bo.  I have welcomed this challenge and I hope that in past menus for them, I have succeded to thier food enjoyment.

As a sister, I am proud that she has stuck to her beliefs in food in general. I may be a meat eater, but what my sister has educated me over the years is to understand my food and the food I cook and respect those who choose not to eat meat.

In many years past, vegans and vegetarians were thought of as wacky, free being, communal folks but in today's world, they are exactly what people should be (well maybe not so communal). The rest of us are only slowly learning this through the media in which we are so drawn to and rely on. That's a sad and sorry means to learn something that should be inherent.

Those vegetarians, vegans and macro biotic in years past were so way ahead of the game when it comes to wanting to live a full and healthily life. Being eco friendly and appreciate what mother earth gives them.

We as a crazy American society are just learning what the food we eat, does to our body. I for one do admit that I am not the perfect eater. Again, I love meat, but that does not mean I don't care about the meat I do eventually eat and do not care about my ultimate health.

I've seen the documentaries on the slaughter houses, the mis treatment of animals, but what is at the most injustice is the corporations that are controlling what and how we eat. It is time for us to take back control. The movie/documentary that really opened my eyes was Food Inc. This was a turning point for me as I learned with all the technology we have, we as the consumer should speak up by purchasing the right foods. By purchasing the foods we know where it comes from.

Please start to buy Organic, Pasture Fed and Bred and Free Range.  Add more veggies and whole grains to your dietary appetites. You will live happier and longer and most likely keep you away from the hospital.

Friday, March 12, 2010

Risotto- Done in my Italian way

That’s right, it’s risotto time! I haven’t made this dish in ages and although I only had 2 votes on what to cook next, I am glad that at least one person picked the risotto dish (I secretly picked the other). I’ve got big plans this weekend (big rain storm coming) to cook a few dishes. Keep on the lookout for my Homemade Ravioli and I will be making the Chocolat Bouchee even though no one picked it.

Back in the 90’s I had catered one of my mother’s many X-Mas parties and one particular year, the biggest hit of the evening was my Risotto with Sausage, Mushrooms, Asparagus and Fontina cheese. No sooner did I remove the dish from the stove to a serving bowl, it disappeared in a flash. All 50 guests or so, just ate it all up, coming back to the kitchen and asking me to make more!

I also use Risotto as a deciding factor among Italian Restaurants. If the restaurant serves risotto, I will order it and if it’s not done properly, that Italian Restaurant is off my list of places to eat. Risotto is a long cooking process and if not cooked properly, it can be either too crunchy or too mushy. Ultimately, you really have to love cooking to attempt this dish, it’s all about patience.

Overall, Risotto is pretty easy to cook, except for the fact it is a 45 min process without any prep time for any additions. However, this is a Learned Process. Sometimes, following Risotto Recipes are not enough. I personally learned how to cook this dish from my father, who explained and showed me along the cooking process what is properly cooked risotto. This dish, the rice specifically really comes down to being cooked Aldente and if you don’t know what that really is, you will have to cook this dish a few times before you can feel comfortable serving it to others.

Risotto is also great the next day. You can, depending what you may have added to it, you can make wonderful Risotto Balls. Just like you would make say, breaded chicken, you just ball up the risotto into say a golf ball size or a little bigger, dip in egg, and then roll in breadcrumbs…At this point you can fry them in some canola or extra virgin olive oil for a great treat or appetizer.

After the 5th Ladle
At the 6th LadleFinal with Sausage addedClose up!

Risotto with Sausage, Mushrooms, Asparagus and Fontina cheese
Serves 4 as a main meal-can serve up to 8 as an appetizer
  • 2 c Arborio Rice
  • 1 Medium white onion Minced
  • 2-3 cloves Garlic Minced
  • A few Tbls of Extra Virgin Olive Oil
  • 2 Tbls Unsalted Butter
  • 3 Links of Italian Sweet Sausage-Casing removed (About ½ pound if not in link form)
  • ½ pound of Asparagus cut into about ½ inch pieces
  • 1 small package of White or Baby Bella Mushrooms sliced
  • ½ c Fontina Cheese Grated
  • 6-8 Cups Broth (you can use Vegetable or Chicken-I have used Chicken for this Version)
  • 1-1/2 c White Wine (Pino Grigio or Chardonnay-Buy what you would drink)
  • S/P to taste 
Make sure you have all your ingredients prepped ahead of time. It will make the process easier.

Step 1: Mince your Onion and Garlic and set aside
Step 2: Cut your Asparagus and mushrooms and set aside
Step 3: Grate your Cheese. Tip: if you are using a food processor, because Fontina is a Soft cheese, place it in the freezer for about 30 minutes. Then feed through your processor and set aside.
Step 4: Break up the Sausage into small pieces and sauté on medium heat until fully cooked and set aside.
Step 5: Heat up your Broth in a separate pan and keep it on a very low setting to keep it hot.

***This is now where you should not leave the pan at anytime***

Step 6: Pre-Heat a Large Fry pan or Dutch Oven over medium heat. (for Risotto newbies…I mean a Large. The rice will double in size as its being cooked)
Step 7: Add Extra Virgin Olive Oil and Butter. When butter has fully melted add Onions and sauté for about 2 minutes. Then add Garlic and continue to sauté for another minute.
Step 8: Add Arborio Rice and sauté for another 3-4 minutes. Cook, stirring until rice becomes opaque in color.
Step 9: Add White Wine and continue to stir rice until all liquid has dissipated/soaked into the rice
Step 10: Add 1 ladle or 1 cup of Broth for each interval, continually stirring the rice and liquid…Meaning add 1 ladle or 1 cup of Broth and stir until all liquid has dissipated/soaked into the rice, then add another ladle or 1 cup of Broth…Continue this process until you get to about the 5th ladle/cup. Your rice at this point should start to have a starchy milky look to it. This is good, as Arborio rice should have that starchy milky liquid.

***IMPORTANT***

Now for the first taste test…The Rice should be Aldente-“To the Tooth”…Which means that the rice should have a little bit of a bite, but not too much. You want the slightest resistance of the rice. If your rice is still crunchy that you can taste the crunch more than the rice itself, you will need to add more liquid. At the 5th Ladle/Cup, you should start to taste. Make sure you keep on tasting prior to each broth addition from this point on!

Step 11: Add Sliced Mushrooms, more broth and continue stirring. At this point your rice should have almost doubled in the pan.
Step 12: on your second to last ladles of Broth, add your Asparagus. Continue to add the remainder of your broth (you may not need to use all of it) until rice is done and turn heat off.
Step 13: Add Sausage and Fontina cheese…Stir until everything is incorporated and serve!

Wednesday, February 24, 2010

3rd in a Million Ways to Prepare Potatoes

So, I watched Secrets of a Restaurant Chef with Anne Burrell a few weeks back and she prepared a potato dish called “Pommes Chef Anne”. It’s funny that this show magically appeared, as I was putting together a post about one of my favorite potato dishes: Potato Pancakes. But Chef Anne’s dish looked so good; I thought I would forgo the potato pancakes this time and try her recipe out.

I ultimately made 2 batches on separate days, but I forgot, with the first one I made, to take pictures and that gave me an excuse to make it a second time. I modified Chef Anne’s recipe on both occasions because I felt I wanted a little more flavor.

The really nice thing about this recipe is it’s between a potato pancake and an au-gratin (without all the dairy and butter). Don’t get me wrong, there is cheese-Parmesan Cheese! One of my kitchen staples. But I rarely think of Parmesan Cheese as a heavy dairy product like Cheddar and other worldly cheeses.

So following the recipe, my first go at it I layered in thin slices of onion. This was absolutely delicious, but my second round I added thin slices of garlic and onion and it made the dish even better! I topped the second version with a drizzle of Serrano cream, which was the ultimate addition to flavor.

Sorry-I did not take pics with the cream on top. I was so hungry when I made this, that I completely forgot.

Here is the Recipe Link: Pommes Chef Anne

Serrano Cream
  • 3 fresh serrano chilies or jalapeños, seeded and chopped fine 
  • 1 large garlic clove, minced and mashed to a paste with 1/2 teaspoon salt  
  • 1/2 cup sour cream
Make the serrano cream:

In a blender or mini food processor blend together the chilies, the garlic paste, and the sour cream until the mixture is combined well. (Be careful not to overblend the mixture or the cream may curdle.) Force the mixture through a fine sieve set over a small bowl. The serrano cream may be made 1 day in advance, kept covered and chilled, and brought to room temperature before serving.

Saturday, February 6, 2010

Tomato Soup and Processed Sin

I will admit that even though I consider myself a food snob of sorts, I do love a classic American grilled processed cheese sandwich with tomato soup, especially during these winter months. Now, you might think this is about the classic canned Tomato soup and all American Grilled Cheese, but you are half wrong.

I did buy a can of that classic canned Tomato soup a few weeks back and found it very strange tasting. As a kid I loved this soup (but what kid doesn't?). After not having that canned soup for years and years and then buying it, because I was lazy, a huge mistake and a waste of my taste buds and time. I ended up adding homemade croutons, parmesan cheese and other herbs just to make the soup bearable and even that didn't make it very edible. So, for now on, Tomato soup will be all homemade for me.

Back to the sandies...In this case it's totally all American born or it ain't the processed sin we all but hate to admit we love to crave. You can't argue the sinful taste of the buttery, oozing American Grilled Processed Cheese. I'm a bit of a purist with this processed cheese sandwich. When I do make it, I use soft white bread (yeah-the balloon brand) and room temp butter and in a fry pan, not a grill and not a waste of space Panini maker. Sometimes I have a hankering to add some sliced tomato and/or add bacon. Spicy or just yellow mustard on top makes it the Bomb!

Don't get me wrong...a Caprese, Fontina w/Arugula, Munster w/Caramelized Onion (my French Onion Soup Sandy), Goat Cheese w/Chive, Tarragon and a drizzle of Honey and other "couture" grilled cheese sandwiches are just mouth watering heaven and higher on my list of amazing eats, cooked on a stove top grill or grill pan. Give me any good artisan melting cheese, herbs, crusty bread, olive oil and garlic and I can't even describe the pleasure I get, even just thinking about making and eating it.

Even though the canned soup was a waste of my time, it should also be yours too. Homemade is the better, tastier, easy and most economical to make believe it or not. I'll do my best here to list the Soup Ingredients and Instructions as my cooking...not baking...is a measured by eye, taste and whatever I have in the pantry. This will make approximately 12 Servings. It's a lot of soup! 
 
Winter time is hard to find good ripe plum tomatoes, so I've gone with canned tomatoes that I usually use for pasta sauce. Don't worry, at first the soup may tast a little tinny from the canned tomatoes for the first taste test, but after it simmers for a bit, all flavors will combine and the tinny flavor will go away.

Tomato Soup
Special equipment: Either a Blender or Handheld Blender or a Food Processor


  • 2-28oz cans of Whole Plum Tomatoes

  • 1-15oz can of fire roasted Chopped Tomatoes with ancho chili pepper

    • (if you cannot find this item, 1-15oz Can of Chopped Tomatoes and 1 Roasted Red Pepper can be substituted)

  • 3 Cups Vegetable or Chicken Broth-Approx
  • 4 Cloves Garlic-Chopped Finely
  • 2 Medium Shallots-Chopped Finely
    • (1 half of Medium Onion can be substituted)
  • 3 Tbls Extra Virgin Olive Oil-Approx
  • 1 Tbls Dried Oregano or Italian Herb Mix-Approx
  • 1 Tbls Fresh Rosemary-Chopped-Approx
  • 1 Half Pint Heavy Cream or Half and Half
  • 1/2 Lemon
  • S/P to Taste
-In a large pot (Pre-Heated) on medium heat add Extra Virgin Olive Oil and Shallots and sweat (about 1-2 min), then add garlic to sweat (another 1-2 Min).
-Add Rosemary and Dried Herbs-A couple of quick stirs to incorporate. Add Tomatoes with their juice and bring to a simmer. At this point-take the mixture and puree. If you like it a bit chunky, make sure you reserve some of the tomato mixture.
-Add back to pot (on medium heat) and add Broth, stir and bring to a simmer again for about 15 minutes. 
-Add S/P to taste with a squeeze of lemon juice and stir for another minute or 2. Then add Heavy Cream and stir while bringing the soup back up to a simmer. DONE!
-Serve with your Favorite Grilled Cheese Sandy or just toasted garlic bread
-Add a dollop of Sour Cream or just drizzle with some olive oil.

Sunday, January 31, 2010

Potatoes with Style

Poor in NYC? Need a way to feed yourself and others on the cheap? Well, if you don't have alot of bucks and are willing to put a little time and effort into this next adventure, this meal is for you!

Gnocchi, Gnocchi, Gnocchi, Gnocchi!

Just 3-4 plain old russet or idaho potatoes (depending on size), 1 large egg, 1 cup of flour and a dash of salt will feed a party of 4 or even more! in NYC that adds up to approx $5-$7. I say $5-$7, because you can't just buy 1 egg or just 1 cup of flour. Most traditional recipes don't even need egg.

Yes...Make it homemade! There are plenty of recipes out there on the web that will show you how to make it. There is no special equipment needed except your hands, a fork and a little time. But if you have a food mill or potato ricer, an Gnocchi paddle, these can help but really don't speed up the process.

Now, I'm new to making Gnocchi from scratch, but not new to making my own pasta, so most of the On-line Tutorials were easy for me. Once you get the knack for making any kind of dough, it's a quick process. I recently made my own batch-took me about 60 minutes after the potatoes were cooked and cooled.

Sauce options:
  • Simple Marinara Sauce (Cheap!)
  • Pesto
  • Gorgonzola Cream Sauce
  • Alfredo Sauce
  • White or Black Truffel Olive Oil and Fresh Sage and Rosemary
  • Fresh Sage and Butter (Cheap!)
  • Putanesca
  • Wild Mushroon or Porcini
...the list can go on and on...just think out of the box
Here are some links to sites that I found extremely helpful in my quest to make homemade Gnocchi:

YUMMY and Satisfying! I encourage anyone and everyone to make Gnocchi from scratch...You know what goes in it. You know who made it and you know it will taste better than if you bought it.

Friday, January 29, 2010

Hankerin’ for junk food?

I don’t know about anyone else out there, but I LOVE potato chips. I hadn’t thought about making them from scratch for a long, long time, until I recently made a huge batch of Gnocchi and had 2 russet potatoes left.

So the end result was that I did make a batch of homemade potato chips. And folks, these taste so much better than ANY Store bought brand. Yes, these just happen to be plain, but you can do so much with these, just like any other potato recipe.

  • For a cheesy touch, while hot, sprinkle some parm cheese
  • For an herbal touch, chop up some fresh rosemary and sprinkle on top
  • Use Sea Salt for seasoning, some black pepper, paprika or cayenne pepper for heat.
  • Use all combinations above…the ideas are limitless! And you better believe these are much healthier and tastier than the store bought brands.

Cucumber Cravings

I was watching the food network-Iron Chef (repeat) with Bobby Flay and Morimoto the other day. Flay created some dish, can’t remember the main ingredient, but he did something with Cucumber that got me thinking...

Flay’s soux chef had cut the cucumber into a noodle style and mixed it with sherry vinaigrette. Sounded so yummy, so I came up with my own version.
 
Cucumber Noodle Salad
Approx 2 Servings
Special Equipment: Mandoline with a thin Julienne blade.
  • 1 Large Cucumber
  • Half Pint Cherry Tomatoes quartered
  • Few Sprigs of Tarragon roughly chopped
  • About 10 Leaves of Mint roughly chopped
  • 1/4 lbs or less of Feta Cheese
  • Juice of 1 Lemon
  • 2-3 Tbls of Extra Virgin Olive Oil
  • S&P to Taste

Preparation Instructions:
  • Use your Mandoline with a the Julienne blade to cut the cucumber into long noodles.
  • Add Cucumber to a bowl with chopped herbs and tomatoes, mix gently with your hands.
  • Place mixture on plate or in a Bowl. Sprinkle Feta Cheese over salad mixture, then add S & P. For each serving, drizzle extra virgin olive oil and squeeze the juice of 1/2 lemon over the salad.